MiniWave Display Operation ManualUpdated 17 days ago
Home interface description (L200SFZ22):
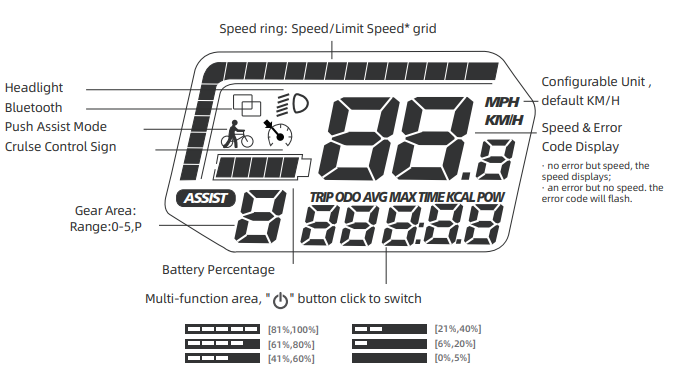
- The display provides a comprehensive overview of your eBike's status and performance. At the top, the Speed Ring shows your current speed and the speed limit grid, configurable in KM/H or MPH.
- To the left, indicators include the Headlight status, Bluetooth connection, Push Assist Mode, and Cruise Control Sign. Below these, the Gear Area displays the assist level, ranging from 0 (no assist) to 5 (maximum assist).
- The Battery Percentage is clearly represented in bars, showing charge levels from 0% to 100%. In the center, the large numeric display indicates speed, while the Multi-Function Area at the bottom allows you to toggle between trip data such as TRIP (trip distance), ODO (odometer), AVG (average speed), MAX (maximum speed), TIME (ride duration), KCAL (calories burned), and POW (power output) by clicking the “●” button.
- Lastly, the Speed & Error Code Display alerts you to any issues: normal operation displays speed, while errors trigger flashing error codes for troubleshooting.
Operating the display:
The display controls are simple and intuitive:
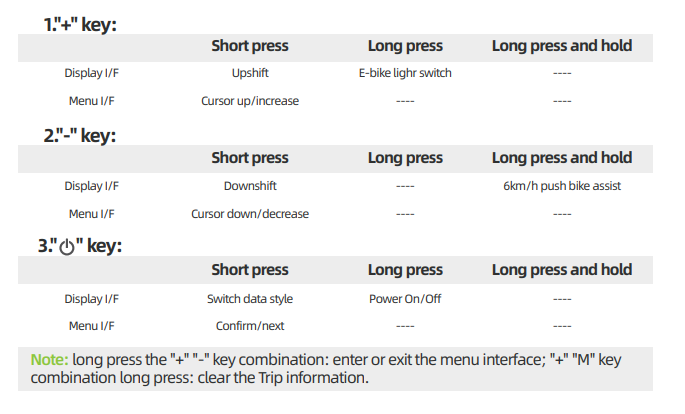
"+" Key:
- Short press: Increase assist level / Move cursor up
- Long press: Turn on/off the eBike light
- Long press and hold: No function
"-" Key:
- Short press: Decrease assist level / Move cursor down
- Long press and hold: Activate 6km/h push assist
"●" (Power) Key:
- Short press: Switch data display / Confirm menu selection
- Long press: Power On/Off
Quick Tip:
- Press and hold "+" and "-" to enter/exit the menu.
- Press and hold "+" and "●" to reset Trip information.
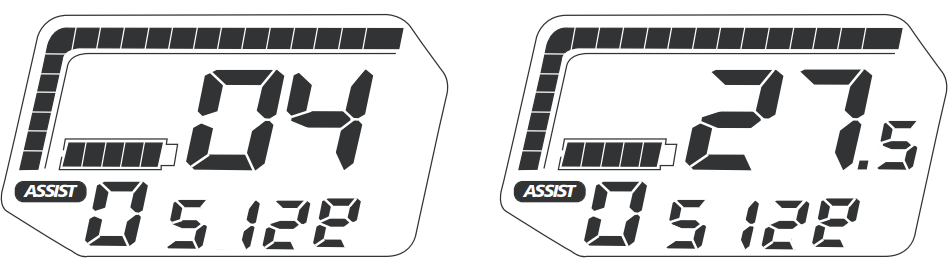
- When selecting the "Size" item, press the "
 " key to enter this item, and then press the "+" and "-" keys to select the wheel diameter, ranging from 04 to 99. In particular, 27.5 inches displays "27.5"; then press the "
 " key to confirm. and exit the item.
The L200SFZ22 display is designed to provide an intuitive and user-friendly interface, offering complete control over your eBike's performance and settings. By familiarising yourself with the key functions and indicators, you can easily monitor your ride, adjust settings, and troubleshoot issues as needed. Whether you're managing assist levels, tracking ride data, or customising the display settings, this manual ensures you have all the information to make the most of your eBike experience. Enjoy your ride and explore with confidence!
⚙️ Advanced Settings Overview
The advanced settings menu is intended for factory-level configuration and should only be accessed if you're confident in what you're adjusting. Most parameters are pre-set for optimal performance with your MiniWave and should not be changed unless specifically instructed by Ridewave support.
Below is a reference guide to help you understand what these advanced parameters mean:
CY – Wheel Circumference
Default:1710
This is calibrated to match the tyre size on your MiniWave. Altering this value may affect speed and distance readings. Do not adjust.STEEL – Magnet Count (Motor Speed Sensor)
This refers to the number of signal magnets used for speed measurement. Do not change this value.Paoto – Protocol Profile
Default:08
This setting ensures compatibility between the motor controller and display. Value08is specific to MiniWave models and must remain unchanged.URAT / UaRt – Display Communication Protocol
Used for data transmission between display and controller. The correct protocol is hardware-dependent and set by the manufacturer. Do not alter.UOL – Voltage Setting
Default:48V
This corresponds to the battery voltage on your MiniWave. Adjusting this may cause misreadings or system errors. Leave as is.Batt / Batty – Battery Protocol
This governs how the system reads and manages battery data. Incorrect settings may result in charging or range issues. Do not adjust.AL – Amp Limit
This restricts the maximum current the motor can draw. It’s configured to balance power and safety. Should not be changed.AP – Advanced Password
This is the access code required to unlock the advanced settings menu. It is typically pre-set and should not be changed unless advised.PUSH – Walk Assist Toggle
This allows you to enable or disable the walk assist feature, which activates by holding the “–” button on your controller.Speed – Speed Limit Setting
This defines the top speed for pedal-assist and throttle.Setting this to
25(default) limits your bike to street-legal mode.Setting it to
Nremoves the speed cap and allows the motor to reach its full potential, including full-throttle operation.
⚠️ Important: This unlock mode is intended for use on private property or off-road only, and should not be used on public roads or bike paths in accordance with local laws.